

Night photography tips
Night photography tips
Gaining sharp, crystal clear photographs at night time doesn’t have to be hard and you don’t have to be a professional photographer or have the most expensive camera to do it. Photographs taken at dusk or night time can be beautiful and have all of the clarity and depth of a daytime picture, if you just know how to take them. These basic night photography tips will help you take the most stunning photos after dark, whatever your camera, and bring your photos to life like never before. As long as you know how to use the features on your camera to maximize the best night time shots you can become a pro in no time at all!
https://youtu.be/HBRf-qSPqG4
Get a Tripod
If you wish to take stunning evening images, these night photography tips should be taken into consideration. The first rule is to invest in a tripod. It doesn’t matter how steady you think your hand is, for top quality night time shots, it’s always a bonus to own a tripod. A great example of when to use one is if you are planning to photograph a street scene at night, if you wish to capture busy scenes with lots of motion and people it’s always better to use a tripod to steady your focus. Also try to experiment with your shutter speeds to gain the correct balance of light and shade on the image. These effective tips will help you gain pristine, awe-inspiring images which would otherwise be difficult if you were shooting the scene manually.
Check Your Shutter Speed and ISO Settings
Secondly, check your camera has a fast shutter speed, if it hasn’t it may be time to upgrade, as the capability of your camera may be limited. The shutter generally improves the quality of your photos and a low ISO setting will also add to the clarity and quality of a night time shot. However, it is worth bearing in mind that if you increase the ISO settings it’s likely the digital noise will increase too. This creates a grain which is more pixilated and gives a less attractive end result. Remember you don’t always have to use a high ISO setting in low light, you can shoot at a low ISO and still retain a great quality picture.
Exposure Compensation Settings
To ensure the images you capture at night are as spectacular as your daytime shots, you also need to adjust exposure compensation settings. If you are new to photography this night photography tip is paramount to ensuring you retain clarity in your photos. The exposure compensation setting on your camera is usually marked with a “+ or –” setting. The plus setting brightens the image and the minus can darken it. This gives you leverage as an amateur photographer to shoot your pictures in a high contrast scene or in low light and still retain all the quality of a professional photograph. On some cameras the exposure compensation is automatically controlled by the shutter, this typically lightens and darkens your photographs without you having to do anything, thus, allowing you to capture mind blowing images with little effort. Always bear in mind that you want your night scenes to look like they were taken at night, you should try to retain the shadows and realistic feel to the images. If your image is still coming out too bright, use the minus setting to reduce and darken the photograph slightly.
Switch Your Aperture Mode
Other night photography tips include to switching to aperture mode, this controls the shutter speed for you. If you prefer to control this manually you should look to use a 1-3 second shutter speed, no more than this.
Using a Remote Control Function
We always recommend that you invest in a remote control, this is not a useless gadget – in fact some of the most fascinating images you will shoot will be using a remote control function. If you tend to capture your pictures manually your photographs can occasionally come out blurry, always use the remote control to gain the most superior images.
White Balance Settings
Most digital cameras have their white balance set to auto detect, this actually reduces picture brightness. A suggestion is to try to set your white balance settings to “daylight settings” and experiment with this. This is one of the simplest night photography tips that ensures your images retain all of the vivid colors rather than blocking them out with auto white balance. No commercial photographer ever uses the camera in auto mode
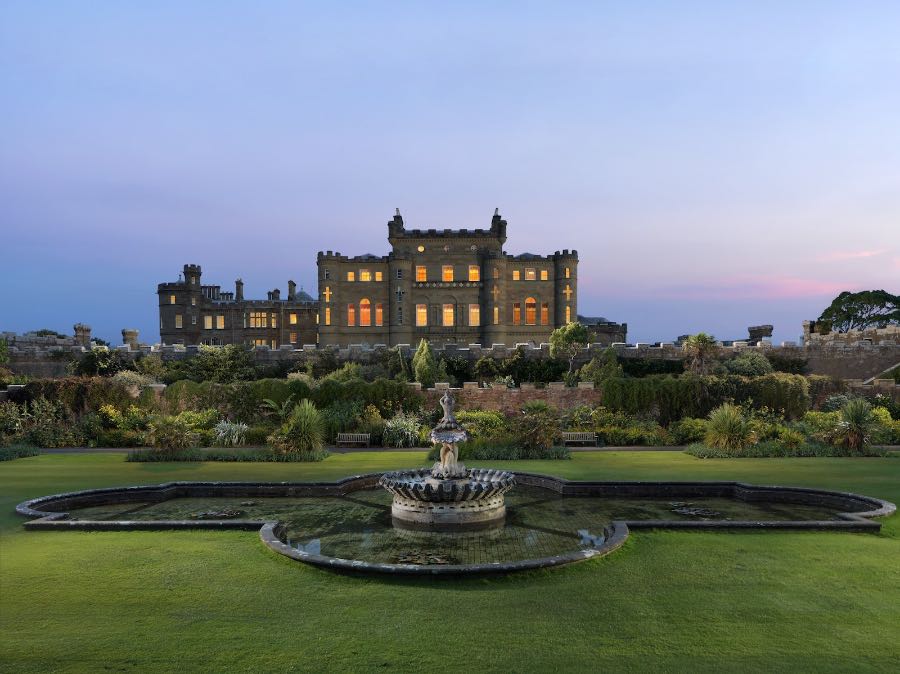
When is the best time to take photos? Perhaps one of the most helpful night photography tips we can share with you is to offer some clarity on the best time to take night time photographs. Choosing the ideal time to take your night shots is vital to the outcome of the final image. If you can, try to avoid shooting in total darkness, the ideal time to capture your images is actually after dusk or just before dawn breaks. Whenever there is a hint of visible light in the sky you will always gain a better evening shot as the colors brighten even more, allowing you to create stunning images with ease. This leaves you with an approximate 30-minute window to take the most spectacular photographs. Ensure everything is set up and ready to go, and prepare to take some of the best night photographs of your life! Explore all of our night photography tips and see how advanced and professional your images become, almost overnight.
Preparing for your Night Shoot – Checklist
Your checklist summary to gain the perfect night time photographs should look a little something like this:
Invest in a tripod to help stabilize your shots and help you retain clarity and superior images every time you go out at night.
Check the shutter speed on your camera is fast enough and also take a look at your ISO settings, remember to try and keep them low if you can as the clarity can be compromised by grain and pixilation the higher the ISO setting. Experiment until you find the setting which is right for you.
Always check your exposure compensation setting, use the plus and minus icons on your camera settings to increase or decrease the light. If your camera has an auto setting for exposure compensation, explore this too and see if the auto function can capture the best night image possible. If not lighten or darken the image and retake until you are happy.
Switch on your aperture mode to control your shutter speed. A 1-3 second shutter speed is the perfect rule of thumb to achieve great evening shots.
Invest in a remote control function to enable fast shooting without visible camera shake.
Experiment with your white balance, try setting them to daylight mode to retain vibrant and mesmerizing colors in all of your night time images.
Finally, head outside ready to set up your camera equipment about an hour before dusk, or if you prefer, approximately an hour before dawn. As the sun goes down or just before sunrise you will be able to capture the most fascinating images of your life. Explore your settings and teach your camera to do what you want it to do for you. You will have incredible, professional night time shots in no time.
About Antonio
Antonio Cuellar is a commercial photographer who specializes in capturing the architecture and lifestyle of the world's most luxurious hotels and resorts.
Follow


Recent Posts
-

The Art of Precision
02 Des 2020


